Tutorial
This tutorial shows how to set up a Sakuli test using the CLI and how to use a combination of the native and DOM-based features of Sakuli.
Setting up a Sakuli Test Suite
Sakuli will bootstrap a test suite with the following command. A detailed explanation on what files are needed, can be found in anatomy chapter.
npx @sakuli/cli create project . --package
npm i
Typescript
This step is optional but we recommend using typescript. For example, in case of a missing await typescript will throw
an error during compilation. But this tutorial will also work if you decide to not use typescript.
npx sakuli enable-typescript .For Typescript to find the respective test-files, you need to change the file extension from .js for JavaScript to .ts
for TypeScript or create a new file. After doing so, it is necessary to update testsuite.suite for Sakuli to find the
testfile.
Native-testing Tutorial
For this tutorial we will create a test that opens the 10 Step Guide to E2E Monitoring whitepaper only using native interaction
and download the document. As we only want to use native interaction we can set testsuite.uiOnly=true in the testsuite.properties.
First we are going to open a chromium browser, navigate to the whitepaper section and download the whitepaper.
(async () => {
  const tc = new TestCase();
  const env = new Environment();
  const chromium = new Application('chromium-browser --incognito');
  const screen = new Region();

  await tc.addImagePaths('./assets');
  try {
    await env.setSimilarity(0.99);

    await chromium.setSleepTime(3);
    await chromium.open();

    await env.type('sakuli.io/wp')
      .type(Key.ENTER)
      .getRegionFromFocusedWindow()
      .waitForImage('open_whitepaper.png', 3)
      .mouseMove()
      .click();
    tc.endOfStep('open whitepaper');

  } catch (e) {
    await tc.handleException(e);
  } finally {
    tc.saveResult();
  }
})();
The following section will describes the details of the test. As a first step we want to open the chromium browser and
use incognito mode. This can be achieved by opening the application with the respective parameter:
const chromium = new Application('chromium-browser --incognito');
As we are using multiple screenshot for this testcase, we will add them to a new folder and therefore eliminate cluttering of the
testcase folder. Hence you need to use tc.addImagePaths("./assets") to tell Sakuli to look into this folder. The base
directory during the Sakuli test is the corresponding testcase folder.
Next we are setting the similarity level for image recognition. The higher the value you choose, the higher the matching score must be. You can also change this within your test to react to different matching-score needs.
As the operating system needs some time to start the application (in this case the browser), we will set a sleeptime.
After the chromium browser is opened the focus will be on the url-tab by default - we can just start typing the url we want to navigate to and hit Enter. The next step is to get the region of the desktop and search for the icon of the whitepaper:

After clicking the icon, the whitepaper PDF will be opened in a new tab. To verify whether the whitepaper was opened
correctly, we try to find the following screenshot on the screen:

To do so, we add the following lines to our test:
await env.setSimilarity(0.98);
await screen.waitForImage('whitepaper.png', 3);
tc.endOfStep('validate open whitepaper');
As a last step we want to print this whitepaper as a pdf (saving it to the file-system). We can do this with the following code:
await env.type(Key.P, Key.CTRL)
  .getRegionFromFocusedWindow()
  .waitForImage("print_dialog.png",2)
  .mouseMove()
  .click()
  .sleep(1)
  .type("sakuli-tutorial")
  .type(Key.ENTER);
tc.endOfStep("download whitepaper");
With CTRL+P we open the print dialog which could look like this.
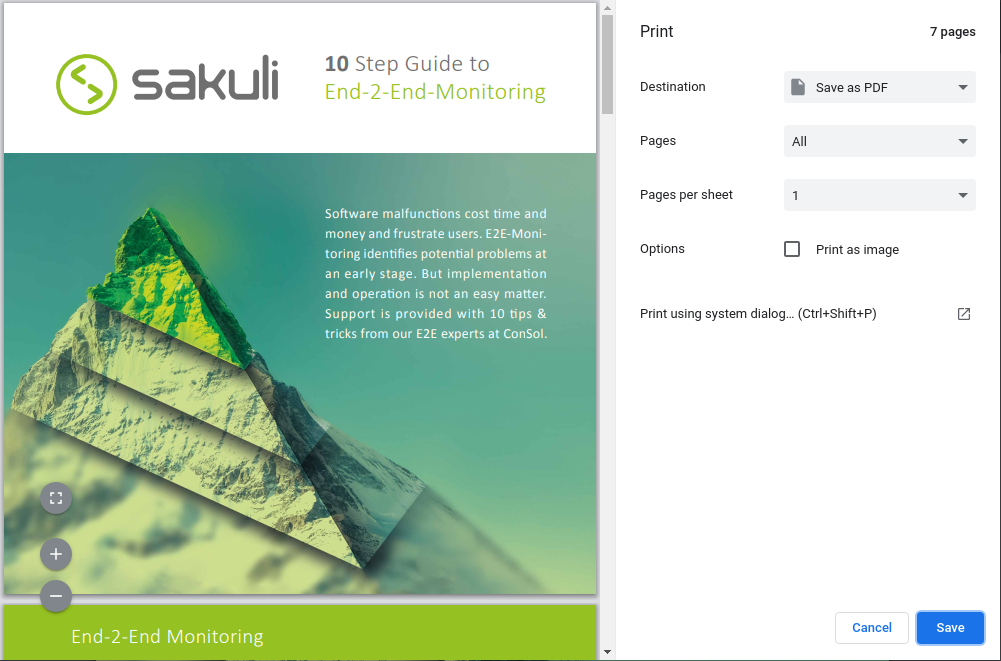
Now we need to move the mouse to the save button and click using this screenshot:

Afterwards another pop up dialog appears, which allows us to change the name of the pdf-file.
For this instance we want to name it sakuli-tutorial.
In the end we need to press enter to save the file.
The complete Sakuli test should look like this:
(async () => {
  const tc = new TestCase();
  const env = new Environment();
  const chromium = new Application('chromium-browser --incognito');
  const screen = new Region();

  await tc.addImagePaths('./assets');
  try {
    await env.setSimilarity(0.99);

    await chromium.setSleepTime(3);
    await chromium.open();

    await env.type('sakuli.io/wp')
      .type(Key.ENTER)
      .getRegionFromFocusedWindow()
      .waitForImage('open_whitepaper.png', 3)
      .mouseMove()
      .click();
    tc.endOfStep('open whitepaper');

    await env.setSimilarity(0.98);
    await screen.waitForImage('whitepaper.png', 3);
    tc.endOfStep('validate open whitepaper');

    await env.type(Key.P, Key.CTRL)
      .getRegionFromFocusedWindow()
      .waitForImage("print_dialog_save.png",2)
      .mouseMove()
      .click()
      .sleep(1)
      .type("sakuli-tutorial")
      .type(Key.ENTER);
    tc.endOfStep("download whitepaper");

    await chromium.close();
  } catch (e) {
    await tc.handleException(e);
  } finally {
    tc.saveResult();
  }
})();
Combining DOM and Native Testing
When the testsuite.uiOnly is set to false, you can use both DOM based- and native interaction simultaneously. For our example above we can exchange the steps for opening chromium and navigating to sakuli.io/wp just with _navigateTo("https://sakuli.io/wp") .
(async () => {
  const tc = new TestCase();
  const env = new Environment();
  const screen = new Region();

  await tc.addImagePaths('./assets');
  try {
    await env.setSimilarity(0.99);

    await _navigateTo("https://sakuli.io/wp");
    await _click(_image(0, _in(_div("flexedContainer"))));
    tc.endOfStep('open whitepaper');

    await screen.waitForImage('whitepaper.png', 3);
    tc.endOfStep('validate open whitepaper');

    await env.type(Key.P, Key.CTRL)
      .getRegionFromFocusedWindow()
      .waitForImage("print_dialog.png",2)
      .mouseMove()
      .click()
      .sleep(1)
      .type("sakuli-tutorial")
      .type(Key.ENTER);
    tc.endOfStep("download whitepaper");

  } catch (e) {
    await tc.handleException(e);
  } finally {
    tc.saveResult();
  }
})();